Showing posts with label Photoshop. Show all posts

Monday, August 10, 2015

Sentinel Armor: Almost done

I thought I'd have the armor done this weekend, but I ran across a handful of issues during testing:

  • Normal maps were barely being applied
  • Everything was overly shiny
  • Only the necks of character models weight slide, heads stay the same.
  • Collision for the objects were way off.

Normal maps weren't being applied correctly due to 1) my meshes using the wrong value for "BS Num UV Sets" (1 instead of 4097) and 2) me not updating the tangents. Correcting those mistakes actually brought out the normal map's details.

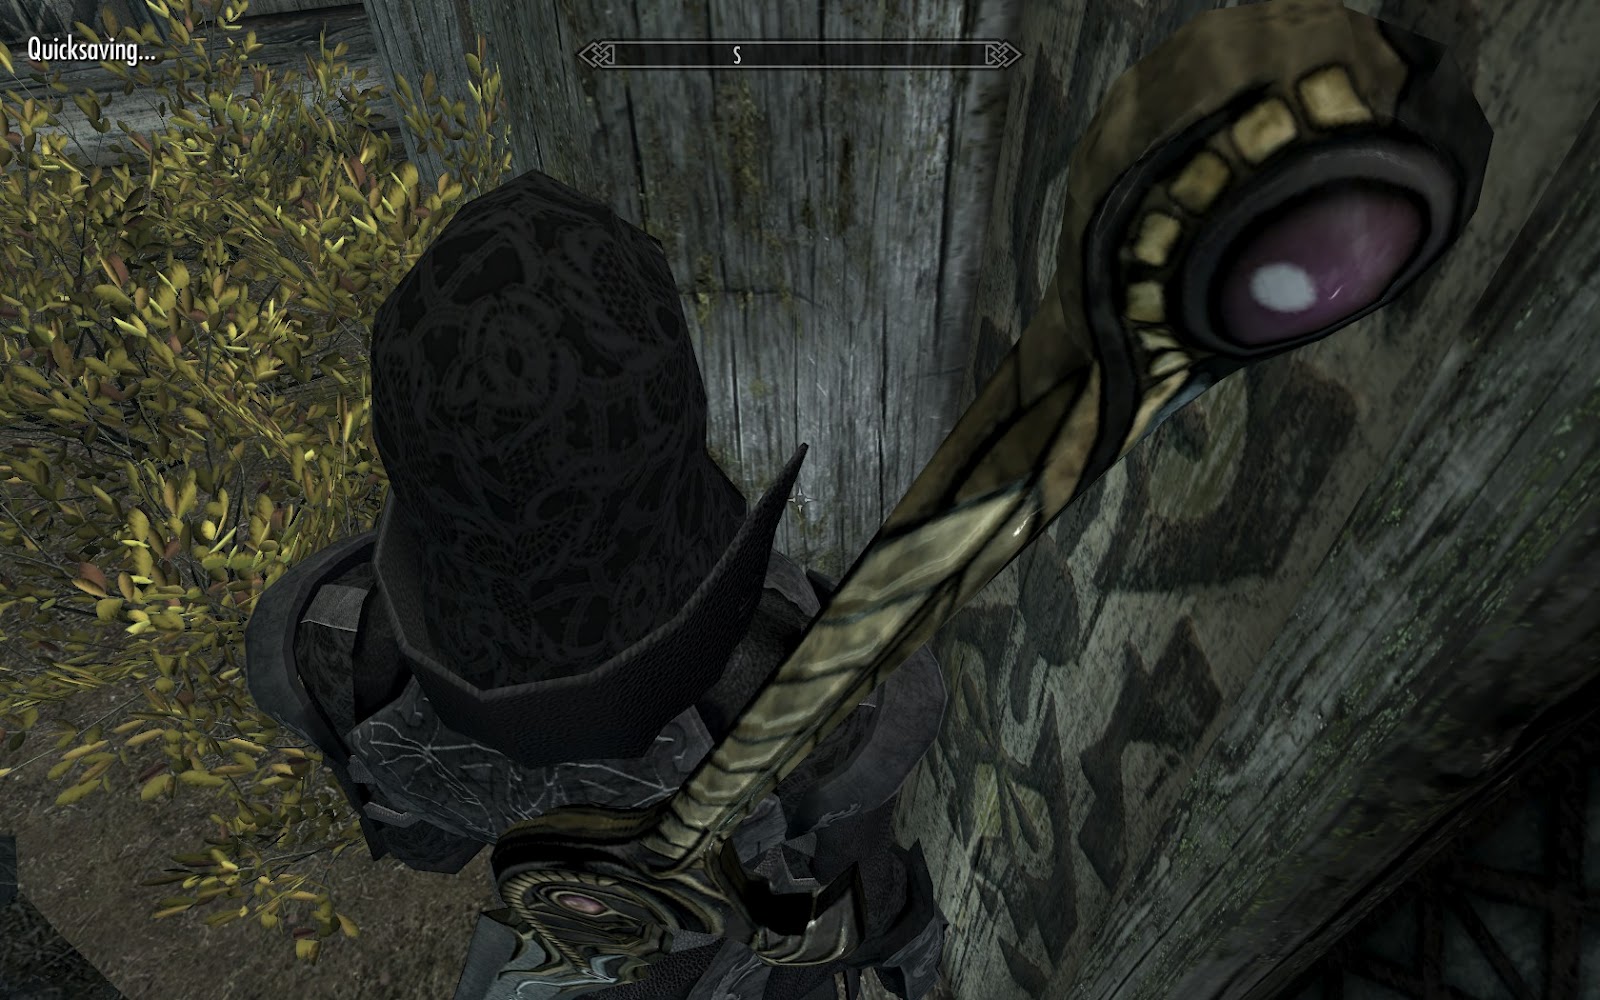
Up next was every setting I used turning my armor to chrome. After looking at Bethesda's textures, I noticed that not only was the "Specular map" (actually, the environment strength map) different from the alpha channel of the normal map (which is actually the "specular map"), it was also a fraction the size of the diffuse map. As a test, I removed the black lines from the base texture to see how well the normals showed.

After a quick jaunt through NifSkope and Photoshop, I was presented with decent looking armor.


However, something looked rather off about the edges. They were the wrong direction and rather choppy. Given it'd been some time since I made normal maps, I mistakenly hit the "Invert Y" toggle in Nvidia's Normal Map plugin. Direction issue solved.

The jaggedness of the normal maps was due to not having layered normal maps (read it in a tutorial somewhere, a few years ago). A layered normal map consists of multiple layers of the diffuse texture, using a different normal filter type on each (4x4, 5x5, 7x7, etc), and overlaying them on each other. This reduces jagged details and helps accentuate varying heights on the normal map.


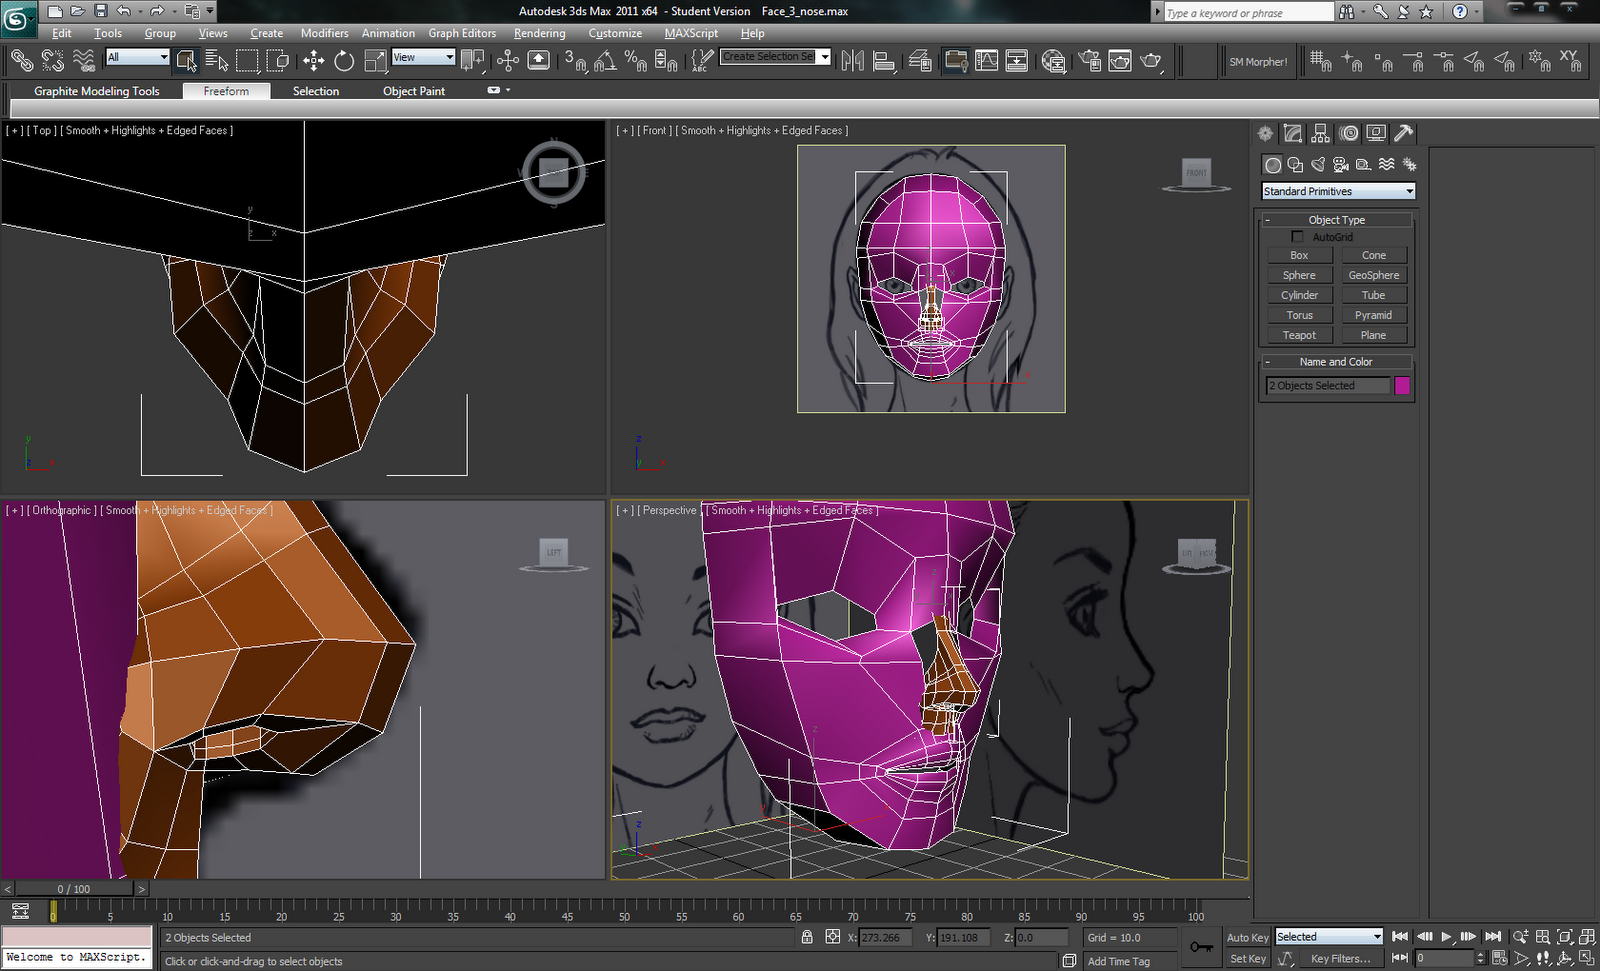
Adjusting the necks looked to be a tedious venture. Reason: I exported the neck AND the helmet meshes together as a single NiTriShape instead of separate. This meant any change to one element would require completely replacing the target mesh. Additionally, I would have to use 3ds Max to remove the neck mesh and re-export it for the Mundane variant. Given that my 3ds Max license is on its last legs, that wasn't going to fly.

To fix this, I split the helmets into their components and exported them together so the resulting Nif would have two NiTriShapes. That way, I could use NifSkope to delete the neck meshes for Mundane variant without much hassle.


I never made a collision model for the Sentinel Armor pieces. Instead, I swapped collisions in from vanilla armors. Bad idea. Aside from having differently sized meshes, I had no idea what values were needed or what they should be set to (translation, radius, rotation, etc). Throwing the ground objects around resulted in some wacky collisions where they'd clip through walls, the floor, each other, etc.

I took to Google for the answers and came across this thread (http://niftools.sourceforge.net/forum/viewtopic.php?f=38&t=4207#p26754) which included step by step instructions for convex shape collision creation.

Side note: Making collision models 10x smaller than the actual mesh is bizarre. You're going to make them fullsize in game later, so why not cut out the middle process? *sigh*

With those four issues taken care of (and replicated for the Unique Sentinel Armor variant), I'm testing how the armor works ingame. Specifically crafting, tempering, and enchanting.

Saturday, January 18, 2014

Scaling up

After several weeks of on-and-off on the Sentinel boot texture, I've decided to model out the scales on the instep and heel. No matter how I mess with the texture, I can't seem to get it right. The best I've come up with is something that could be passable for phalanges if I tapered them. Just not scales.

Not scaly enough


Fortunately, all is not for naught. By attempting to create the scales in texture, I've aligned them with respect to the model. Making the scales is now a matter of tracing the texture with a spline. I know exactly where I want them.

It's not a bad thing, come to think of it. The boots don't have a lot of geometry to them, so any texture details will, uhm, fall flat fairly easily. Modeling the scales will give me a bit more variation when the boots are viewed at an angle.

Friday, November 1, 2013

Sentinel Armor Texture - All those little details


There are a lot of details on this armor. I didn't notice most of them because the Sentinel Armor is almost pure black, but after finding the grey version of the armor, just wow. Blood Dragon wasn't like this. Lines, plates, and layers everywhere. Sure, there were a lot of shapes, but they were easy to trace and make vectors out of. Sentinel is comprised almost exclusively of curved, more organic details.

Right now, I have a lot of line segments outlining the shapes. They'll be combined later into the final designs on the armor.

Sunday, October 13, 2013

Sentinel Armor Progress 6


I've started laying down the base colors for the Sentinel armor. Now, you may notice how both armor models aren't pitch black. That's because I'm using a diffuse texture from a palette swap armor model to make it easier to trace all the filigree.

Like before, nearly everything at this stage is a vector using blending styles The filigree is an exception. The traces are vector lines, but I stroke them onto a layer with the vector mask disabled.

Saturday, April 27, 2013

Trian's Maul Geometry


I forgot to post this while I was making Trian's Maul. Just a quick screenshot of the old model (left) and all the geometry I put on the new model (right).

EDIT:
Due to someone claiming I've stolen textures from Dragon Age 2 (curiously, not Dragon Age: Origins), here is a cropped screenshot (no need to show the tools window or title) comparing the Bassrath-Kata greatsword textures. On the left, mine. On the right, DA2's.


Tuesday, March 5, 2013

BDA - Male Texture


I've got the major details in for the chest, but the arm bands are still unadorned. The dragon doesn't wrap around across the back seam, so I don't have to patch it like I did on the female torso. To avoid reinventing the wheel and save time, I think I'll copy the detail layers from the female torso textures.

Thursday, February 21, 2013

BDA Textures

I've been focusing heavily on the Blood Dragon Armor's textures for the past few days. Mainly the torso. In the beta release, I completely forgot the knee pad details (text, dots, and triangles) and the texture itself looks terrible in daylight.


The armor is really washed out and the details aren't that visible. Sure, it looks awesome at night, but looking good half the time isn't ideal.

If you look back at the development shots I posted of the armor, you'll probably notice the slew of smoothing groups I created for each component. Those groups produced the "details" that distinguished one piece from another. An example being the plating around the visor on the helmet.

I set these groups up to help me see what the model would look like before I started texturing. I thought they would be enough to convey the same message when placed in game. That's not to say they don't help, but small lighting changes can't always compete with the normal and specular maps which produce much stronger effects.

Now, I have the original textures for reference, but they aren't that great. I mean, they look good in game, but when you look at them directly, they're very noisy with very faint scratches that are obscured by said noise. I look at these textures and go, "Well now what?"

Since I generate the normal and specular maps from the diffuse and rarely make major modifications, my initial texture was flawed from the get-go. While I do have separate groups for each of the texture types, I kept them somewhat similar. Increased contrast here, toned down details there, but nothing dramatic.

To solve my texture problem, I've decided to go to the root of my texture and start again. I've added a lot of shading/hightlights/scratches/grunge, increased the visibility of details (what used to be 20% opacity is now 50%), increased the strength of the noise, and cleaned up the dragon's jagged appearance. The specular map has contrast increased twice (100 followed by 30 or so) and a higher brightness to compensate. The normal map now covers every piece of armor instead of un-modelled details.


New diffuse vs old diffuse

That's a bit better

Sunday, February 10, 2013

BDA - Putting it all together

I finished the preliminary textures for all the armor pieces (diffuse, specular, normal, and glow). However, they're a bit too clean and don't quite look right. I was going to work on dirtying them up, but I ran into yet another issue with the armor.

The issue? The same .nif that produced this:
Is now, months later, producing this:
The torso is way too dark.
I made a backup of the .nif while I was trying to get rid of that viewangle clipping issue (still not fixed). So, aside from a name change and a defrag, the file hasn't changed at all since that first screenshot. No amount of fiddling with the first "working" .nif makes it light up normally (despite what http://wiki.tesnexus.com/index.php/Skyrim_common_mod_issues tells me).

I tried exporting to a new file and got this:
The glowing polygons all move with the body, but the main torso won't.

The skin modifiers work in 3ds Max, but when I export, only the glowing polygons work. Exporting just the main torso doesn't work at all. It'll only show the t-pose. Even after fixing up the body partitions, vertex color flags, UV set number (4097), Unknown flag (8 -> 0 and vice versa), Has Normals flag, using existing LightingShaderProperties, and Updating Tangents, nothing works.

I can import the nif into 3ds Max and it'll deform. If I re-export it from there, the model moves with animations, but is permanently black. No manner of tweaking fixes it.

I've already installed and reinstalled different versions of the NIF exporter and, from the initial viewangle clipping problem, even tried a completely different machine and version of 3ds Max.

I'm pretty sure both are deforming
If anyone, anywhere, knows why this is happening, please, I implore you, tell me why. Tell me what critical thing I am missing that causes me so much grief whenever I try to weight a model for export to Skyrim.

The Bassrath-Kata Bow, the Duster, and now, the Blood Dragon Armor set. None have gone smoothly.
The Bow resolved itself with a bit of fuss, the Duster still has random polygons shoot off into oblivion, and the Blood Dragon Armor won't let me export the torso properly. The boots, helmet, and gloves exported like a charm, but the torso? No no no no, can't have that now, can we?

Edit:

My export settings:

Second Edit:
The T-pose issue: SLSF1_Skinned became unchecked. "..."
Still no idea what's going on with the viewangle clipping or why the Duster randomly spazzes.

Wednesday, February 6, 2013

BDA Texture Progress 2


I've added the tarnish and scratches to the torso's diffuse texture. I'm working on the normal and specular maps now. Up next, the helmet, gloves, and boots.

I've reached a decision on the armor's skinning woes: I'm going to release it, broken. I can't find a solution to the problem, haven't found the same problem online, and SoMuchMorpher only produces the "You must specify at least one bone" error whose only solution so far has been "Lol. After I looked at it, I figured out what was wrong. :D" as a YouTube comment from a year ago.

Reasoning: I'm going to crowd-source finding a solution to this problem. I haven't made enough noise on my own, so having however many people downloading, using, and pointing out the problem should help. If it works, I'll know why the problem occurred in the first place. If it doesn't, at least I'll have released another armor mod.

Thursday, January 31, 2013

BDA Texture Progress


I was hoping for a complete image of the Bioware Dragon, but they are either too elusive for me or non-existent outside of the studio. So, I found a couple images that covered most of the dragon and used the Pen tool in Photoshop to draw the rest in. From there, I erased most of the splatters that covered the image and pasted the finished dragon on the torso textures twice and matched them up along the seam (It required some skewing and masking). The dragon and its placement isn't perfect, but I'm happy with it.

I've stripped the armor's scene of everything but the new armor mesh. I'm thinking there's something wrong or missing in the hidden assets, so if I delete everything but what I made and import an existing Skyrim armor with the skeleton at the same time, I won't have the view-angle clipping. Should it fail, I may have to find someone who is better versed in 3ds Max and ask if they could do it for me.


Monday, June 11, 2012

Texturing just got streamlined

Okay, so, when I export a model's UV to Photoshop, I use 3ds Max's "Render UV template" function. This produces a raster image I then import into Photoshop and trace vectors over. Needless to say, this can get tedious. Especially when I make major changes to the UV.

So, I sought out a way to turn those vertices on the UV into vertices on a vector. In the end, I came across Render Pass Manager's PSDPathUnwrapper...and it works beautifully.

The mesh in 3ds Max
The resulting path in Photoshop
  Now, I can simply apply the mesh's path to a layer and cut out the bits I want instead of tracing using the Pen tool. I've already made major changes to the UV and they only took a couple minutes to setup again in Photoshop. No moving around, no zooming in to the pixel level to align vertices, and no complete retraces for broken/merged elements.

Wednesday, May 30, 2012

Staff of Parthalan Progress

I gave up on making UV maps for the branches on the staff. Every time I tried to make some, I ran into scaling issues. On the plus side, I learned how to set seams for Pelt unwrapping.

Utilizing my newly gained skills, I split the branches with abandon and scaled them to around the same size. Then, I split the staff's shaft and flattened it out to run all the way around end to end. This is where I ran into an issue with texture stretching.

Green means no distortion. Red means distortion. Green+red means a little of both.
To fix the stretching, I tried to set the UV vertices in their same relative spacing as their mesh counterparts. This didn't work so well. That's when I found the "Show Edge Distorition" option under the Display menu of the Edit UVWs window. Checking that colors all your edges green or red depending on how much distortion there is (as seen above).

Distortion fixed, I exported the model into Mudbox and fumbled my way around the UI. Once I got the hang of the projection mapping, I used the stock stencils to paint my textures. After that, I exported all the layers into Photoshop for some fine tuning.

All I have left to do now is make the texture for the transition piece that holds the shaft and blade together. Alright, maybe some more tweaking...THEN I'll put it in-game.


Friday, May 11, 2012

Starfang Greatsword

After Vigilance's release, I had a request for Starfang from Dragon Age: Origins - Warden's Keep DLC. So, I made it. Instead of taking 35 days like Vigilance, it only took 9. I'm not sure what to make of that yet. Vigilance was a lot more involved and had a lot of details I turned into actual geometry instead of relying on normal maps. I also lost a lot of time trying to get normal maps to render correctly (tip: check for anomalies if you used MeshSmooth to create your high poly model).

Anyways, I decided to take screenshots documenting its creation instead of making numerous blog posts. Without further ado, here they are:

Starting out. Using Iron Claymore as size reference
Made reference card using Dragon Age wiki image
Eyeballing shape
Basic Detailing
Starting UV unwrapping
Starting the texture
Seeing how the texture lines up on the model
Adding more base colors
Smile!
The interior of the sword reminded me of the Normandy from Mass Effect
Adding details to the texture
Baking AO to give some shading to the texture
Adding the fuller
Reshaping and realigning texture
Adding glow
Glow Set
Ingame shot

Saturday, April 28, 2012

Vigilant Update

I've been hard at work tweaking the mesh for the Vigilance Greatsword remake. I need to stop tweaking it at some point. I'm already at a rather high number of polys according to the overlay.

Original mesh on bottom. My mesh on top.
Oh..missing edge. Fixing now...

The diffuse texture is just basic colors and shapes right now. I worked on the blade today and got it looking kind of how I want it. The key will be getting the specular right. The only specular maps I've made were ones for when I was messing around in Source creating basic textures. Making one for a model is a bit different (Desaturate diffuse!).


I have no idea how I'm going to make the textures for the rest of the sword. The blade was easy because a) I found a tutorial that came close to what I wanted and b) it isn't intricate. The rest of the sword has a lot of little details I need to take into account and I'm not entirely sure what they should look like.

Yes, I have the original texture and made a high def retexture, but that was simply copying what was already there by using the bevel, outer/inner glow, satin, and pattern overlay layer styles. Fake shading everywhere. I tried doing that again and...well...it looked terrible.

I think what is making the texture really hard is me. I want to keep this as scalable as possible and stick with vectors. But there is no point to doing that. I have it at 1024x2048 and anything larger is wasted space on what little vram I have. I need this to sink in.

Once this is finished, I think I'll release it on the Skyrim workshop. If I do that, I'm going to look into making glowing gems, adding flames, and a blood splatter mesh. I don't know why I want this sword so much, but the skills/experience I'm picking up are worth it.

Wednesday, April 4, 2012

Another day, another project

   Iwkya1 has been continuing his 3d character modelling tutorials. Lately, it's been eyes, mouth, and nose. It's rather interesting how you can get such a low poly shape that (more or less) accurately represents rather complex features. I had thought you'd go all out and make it as high poly as possible, then reduce it down so you preserve what you want while still having a high poly version to do baking.

   I know I shouldn't, but I'm waiting for Iwkya1 to merge the meshes together. I want to see if he has some trick to it.


   I haven't been doing a lot of mapping for myself lately. Right now, I'm working on a little scene for a mod and making its logo. I think I'm going to revisit an idea that didn't work and make it so I can finish Test Map Pack 4.

   I've imported the Vigilance Greatsword from Dragon Age 2 into Skyrim. I liked it in both Awakening and DA2. Being that it was never obtainable in game, the HD texture pack for DA2 didn't include a higher res version. So, I've been recreating every little piece of it using vectors in Photoshop so I can scale it up easier.
   The mesh is low poly but uses what appears to be a high poly generated normal map. I scaled that up using Bicubic Smooth enlargement to double its size in 10% increments. Then, I used the blur tool to get rid of pixelation (probably not the best solution, but it worked).

These are old pics of Vigilance I was using to see what was wrong. I'm correcting things now.


Maybe I should email the devs and ask if they could release/send me the higher res texture. Asking for the mesh would probably raise some flags.